You have your Playwright tests running locally. Everything passes. Life is good. But running tests on your machine is not enough. You need them running automatically on every push and every pull request. That's where GitHub Actions comes in.
The Playwright GitHub Actions setup is one of the easiest CI configurations you'll ever do. In this guide, I'll walk you through the entire process from zero: creating a GitHub repository, pushing your code, configuring the workflow, and setting up better failure reporting. Let's dive in.
Prerequisites
Before we start, you need two things:
A GitHub account. If you don't have one, go to github.com and sign up. It's free.
Git installed on your computer.
How do you know if Git is already installed? Open your terminal and type:
git -vIf you see something like git version 2.43, you're good to go. If not, head over to git-scm.com, download Git for your operating system, and follow the installation instructions.
That's it. Two things. Let's move on.
Creating a GitHub Repository
Go to your GitHub account and click the New button to create a new repository. Give it any friendly name, something like playwright-demo or whatever makes sense for your project. You can add a description if you want, keep it public, and click Create repository.
After the repository is created, GitHub gives you a set of suggestions. If your project does not have a Git repository initialized yet, you'll use the first option. It will:
Initialize Git in your project
Create a readme file
Create a first commit on the
mainbranchPoint to the remote origin on GitHub
Push the commit to the remote
Copy those commands and paste them into your terminal. Execute. Done.
Pushing Your Code to GitHub
Go back to your GitHub repository page and refresh. You should see your empty repository with the readme file. Now you need to push all your actual project code.
In Visual Studio Code, go to the Source Control tab, type a commit message (for example, "push all code"), and click Commit and Sync Changes. All your code is now on GitHub.
Go back to the browser, refresh the page, and everything that was on your computer is now in the repository. Yes, that simple :)
Setting Up the GitHub Actions Workflow
Once your code is on GitHub, you can start configuring GitHub Actions. I'm opening the Playwright documentation on setting up CI. The very first section covers GitHub Actions. Here's what you need to do:
Step 1: Create the Workflow Directory
In your project, create the following folder structure:
.github/ workflows/Step 2: Create the YAML File
Inside the workflows folder, create a file called playwright.yaml. The name can be anything, but it must be a .yaml (or .yml) file. This is where your CI configuration lives.
Step 3: Add the Workflow Configuration
Copy the default configuration from the Playwright docs and paste it into your playwright.yaml file. Here's what it looks like:
name: Playwright Testson: push: branches: [ main, master ] pull_request: branches: [ main, master ]jobs: test: timeout-minutes: 60 runs-on: ubuntu-latest steps: - uses: actions/checkout@v4 - uses: actions/setup-node@v4 with: node-version: lts/* - name: Install dependencies run: npm ci - name: Install Playwright Browsers run: npx playwright install --with-deps - name: Run Playwright tests run: npx playwright test - uses: actions/upload-artifact@v4 if: ${{ !cancelled() }} with: name: playwright-report path: playwright-report/ retention-days: 30Let me break down what each section does.
Understanding the Workflow Configuration
Triggers
on: push: branches: [ main, master ] pull_request: branches: [ main, master ]This defines when your tests run. Every time you push code to the main or master branch, or when a pull request is created targeting those branches, the tests will be triggered automatically.
Job Steps
The workflow runs on ubuntu-latest and executes these steps in order:
Check out the code from your repository
Set up Node.js (LTS version)
Install project dependencies with
npm ciInstall Playwright browsers with
npx playwright install --with-depsRun your tests with
npx playwright testUpload the report as a build artifact
The npx playwright test command is the default. You can replace it with whatever command you normally use. Want to run a specific spec file? A specific browser? Just update this line to match the command you run locally.
The browser installation step runs every time because the GitHub Actions runner is a fresh environment. It doesn't know anything about your project. Everything gets installed from scratch on each run.
Running Your First CI Build
Push your changes (the new .github/workflows/playwright.yaml file) to GitHub. Commit, sync, done.
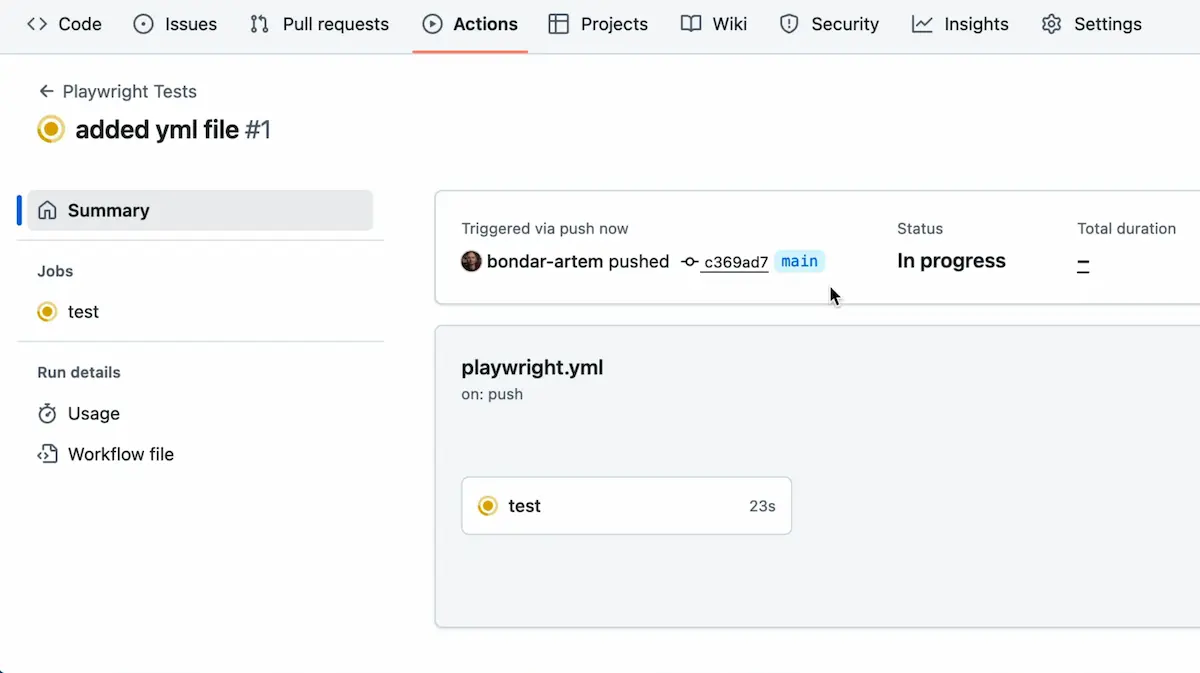
Now go to your GitHub repository and click on the Actions tab. You'll see a new job running. The commit message you typed in VS Code appears here so you know exactly which change triggered the build.
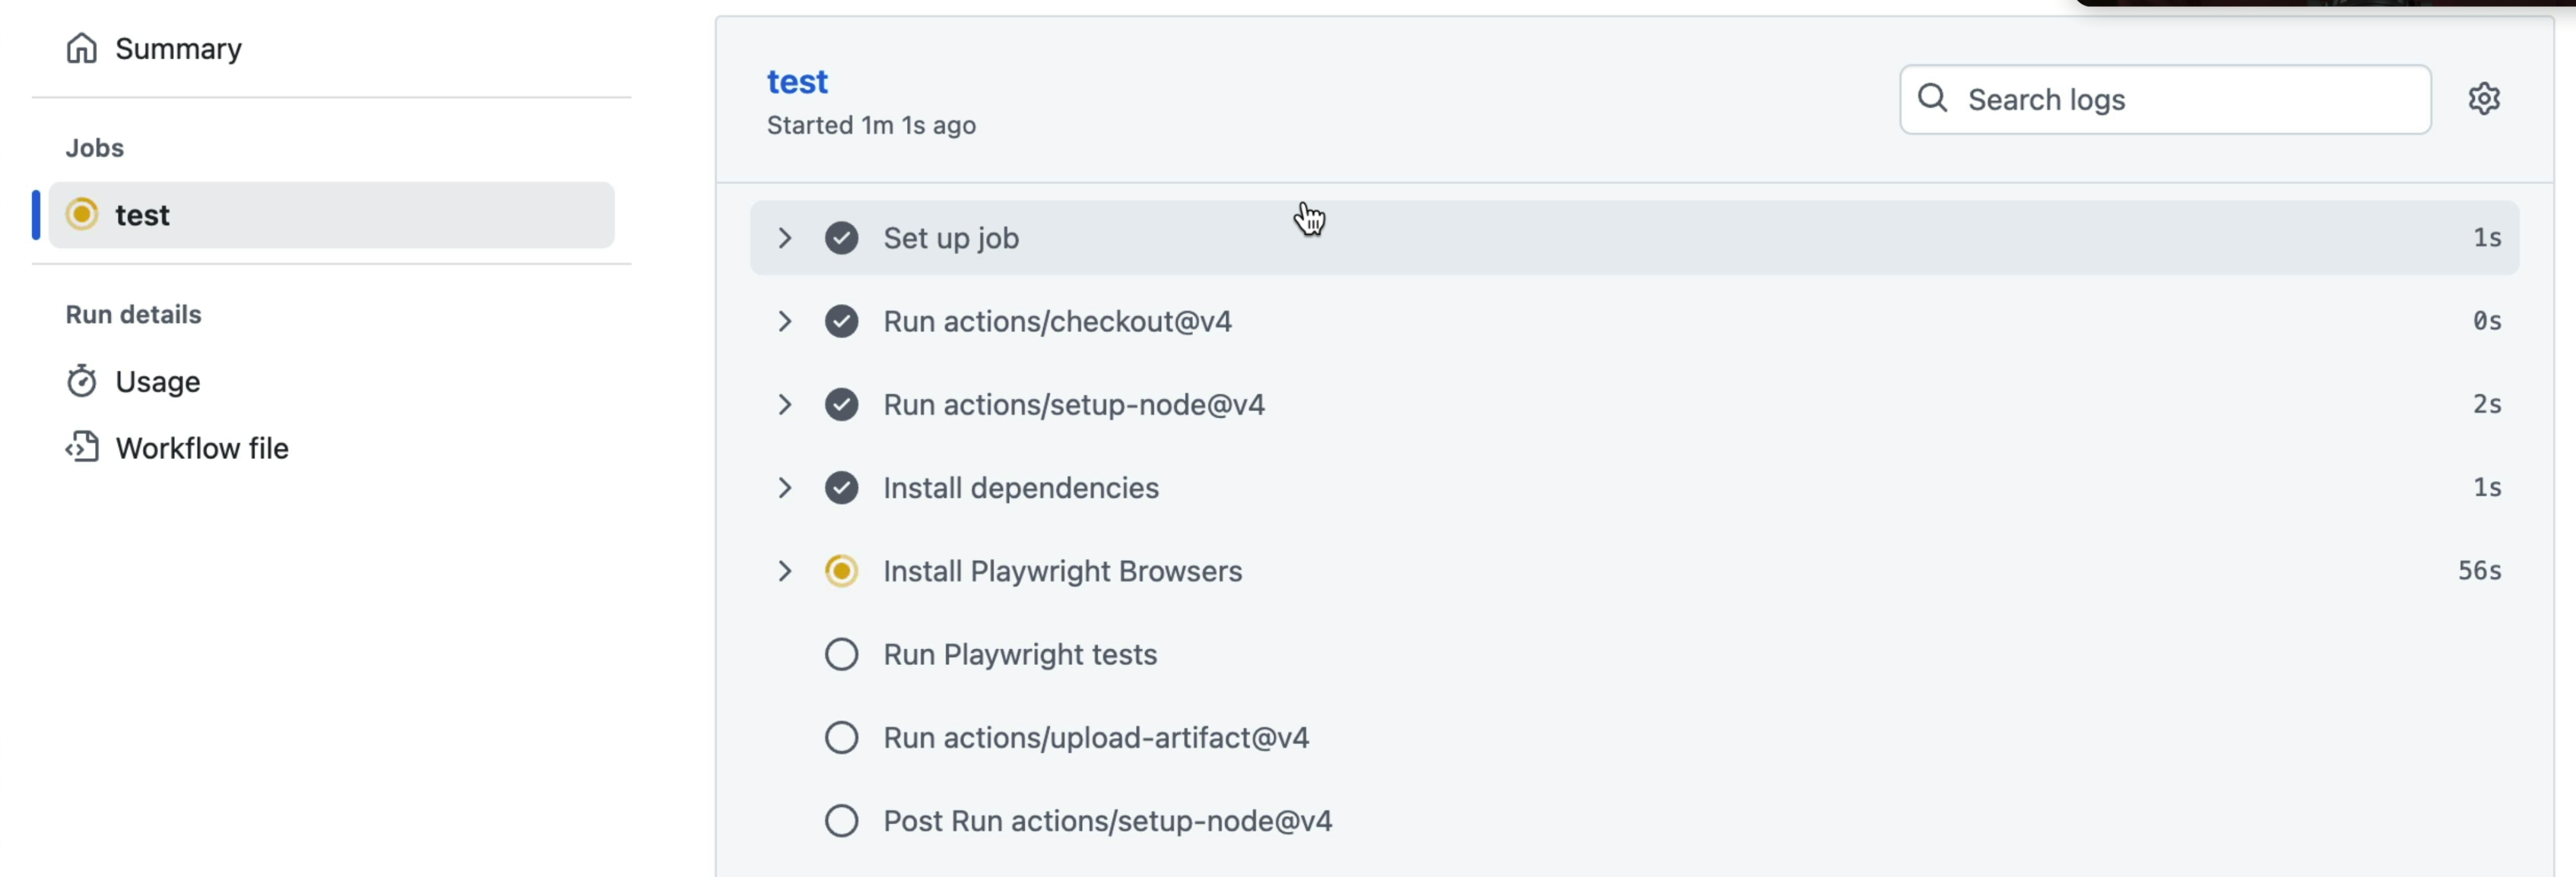
Click the running job to view execution details. You'll see each step as it progresses. First, it installs the Playwright browsers (this takes a moment), then it kicks off the test execution.
Once it's done, you'll see the results. All tests passed? Green checkmark. The Playwright report gets attached as an artifact that you can download and review.
But if a test fails, seeing just "3 of 4 tests passed" doesn't give you much to work with. You want details. You want to know what failed and why.
How? The answer is the GitHub reporter.
Adding the GitHub Reporter for Better Failure Insights
By default, your playwright.config.ts probably has just the HTML reporter configured. That's fine for local use, but for CI you want something better.
Open your Playwright configuration file and add the GitHub reporter alongside the HTML reporter:
export default defineConfig({ reporter: [ ['html'], ['github'] ], // ... rest of your config});The github reporter is built specifically for GitHub Actions. It creates inline annotations directly in the GitHub UI when tests fail, so you don't have to download report files and dig through them manually.
How Failed Test Annotations Work
After the build completes, go to the Summary page of your GitHub Actions run. Scroll down. You'll see a new Annotations section with the details of every failed test.
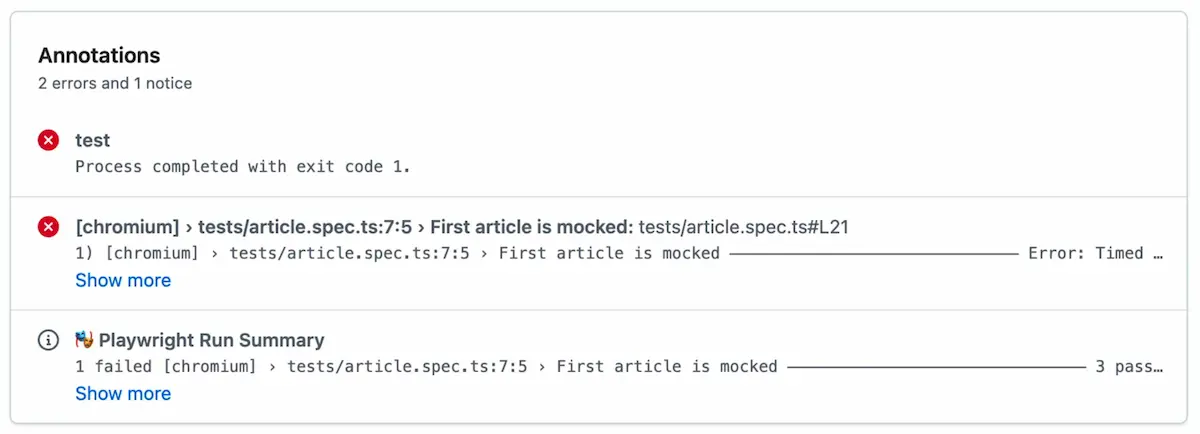
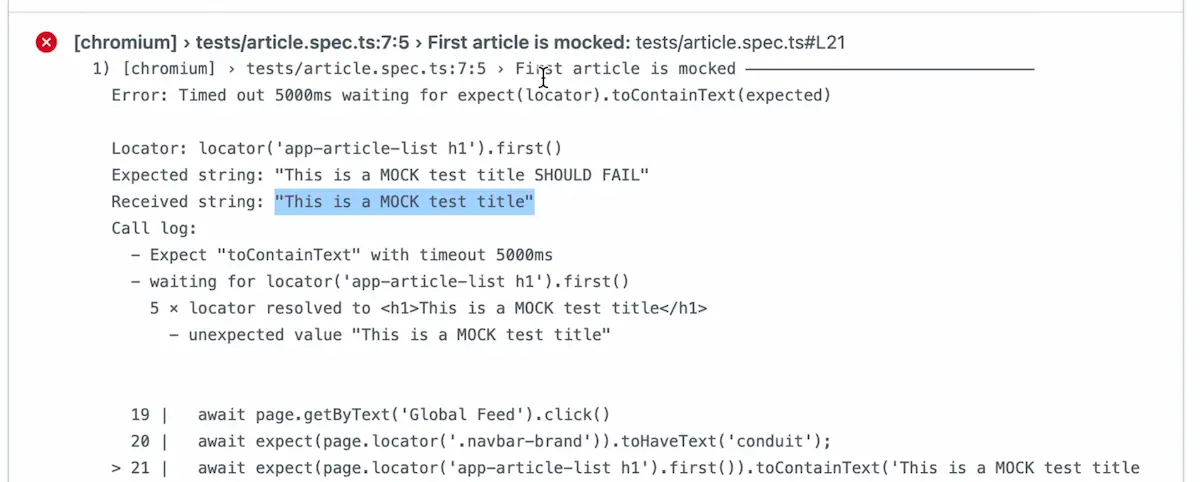
Click "Show more" on any annotation, and you get the full failure log right there. The file where the failure happened (ArticleSpec.ts), the exact assertion that failed, what was expected versus what was received. Enough information to debug the test and understand what's going on without downloading anything.
Two lines of config. That's all it takes to get proper CI feedback.
Rerunning Failed Jobs
Sometimes a test fails, and you just want to run it again. Maybe it was a flaky test, maybe the environment had a hiccup.
On the GitHub Actions page for your workflow run, you'll find a dropdown with two options:
Rerun all jobs - runs the entire pipeline again
Rerun failed jobs - only rerun the jobs that failed

If your workflow has a single job (like our test job), both options do the same thing. But when you have multiple jobs, "Rerun failed jobs" saves time by skipping the ones that already passed.
Why GitHub Actions for Playwright?
GitHub Actions is completely free for public repositories. You can run your tests outside your local machine and set things up so that every code change automatically triggers test execution and provides feedback.
No brainer at all! Your tests should not depend on someone remembering to run them.
TIP: If you're new to Playwright and want to build a strong foundation before setting up CI, check out the Playwright Locators Best Practices guide to make sure your tests are solid from the start.
Final Thoughts
Setting up Playwright on GitHub Actions is easy. Create a workflow file, paste the config from the Playwright docs, add the GitHub reporter, and you're done. The whole thing takes less than five minutes.
And once it's working, every change to your codebase is automatically tested. No one has to remember to run the tests. You just get feedback on every push. That's how it should be.
Playwright is growing in popularity in the market very quickly and is becoming the go-to framework for UI test automation. Get the new skills at Bondar Academy with the Playwright UI Testing Mastery program. Start from scratch and become an expert to increase your value on the market!
Frequently Asked Questions
Is GitHub Actions free for running Playwright tests?
For public repositories, yes, completely free. Private repos get a free tier of minutes per month. For most test automation projects that's more than enough.
Why do Playwright browsers need to be installed on every CI run?
Because GitHub Actions runners are fresh environments. Nothing persists between runs. The runner doesn't know what Playwright is until you tell it to install everything from scratch.
What is the GitHub reporter in Playwright?
A built-in reporter that creates inline annotations on your GitHub Actions workflow runs. When a test fails, you see the file name, line number, and error message right in the GitHub UI. No report downloads needed.
Can I run Playwright tests on pull requests only?
Yes. Just remove the push trigger from the on section in your workflow YAML and keep only pull_request.
How do I run only specific Playwright tests in GitHub Actions?
Change npx playwright test in your workflow to something more specific. For example, npx playwright test tests/smoke/ for smoke tests, or npx playwright test --grep "login" to filter by test name.