As an experienced engineer, I've seen firsthand how crucial Playwright locators are for building stable, maintainable test automation frameworks.
In this deep dive, I'll share the best practices and rules for using Playwright locators effectively. Let's get started with the fundamentals of Playwright locators and how to leverage them for rock-solid test scripts.
What Are Playwright Locators?
Locators are the cornerstone of element interaction in Playwright.
They're identifiers that allow your tests to find and manipulate specific elements on a web page. Choosing the right locator strategy is critical for test stability and maintenance.
There are two key approaches to selecting the locators in Playwright:
User-facing attributes
CSS attributes
Let's examine each in detail.
User-Facing Attributes (Recommended)
Playwright strongly recommends prioritizing user-facing attributes (aka user-facing locators) when selecting elements. These locators reflect how users and assistive technologies perceive the page.
Here are the key user-facing locator methods:
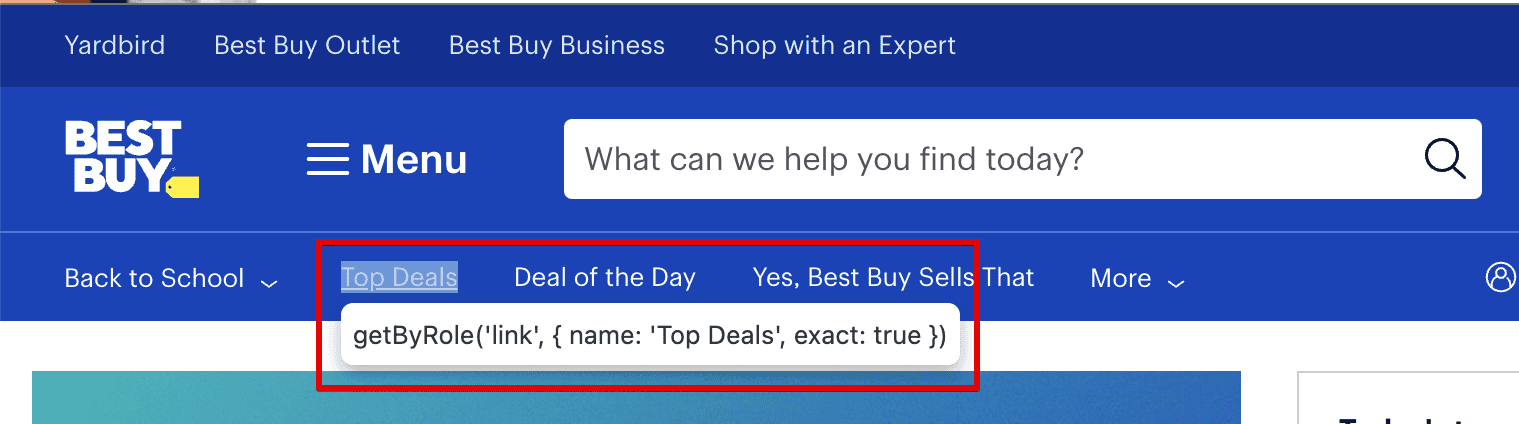
1. getByRole()
This should be your go-to method whenever possible. It selects elements based on their ARIA role, label, or other accessibility attributes. You can also pass a second argument to this method to specify visible text for the target element.
Example:
page.getByRole('button', { name: 'Submit' })List of all available roles:
"alert" | "alertdialog" | "application" | "article" | "banner" | "blockquote" | "button" | "caption" | "cell" | "checkbox" | "code" | "columnheader" | "combobox" | "complementary" | "contentinfo" | "definition" | "deletion" | "dialog" | "directory" | "document" | "emphasis" | "feed" | "figure" | "form" | "generic" | "grid" | "gridcell" | "group" | "heading" | "img" | "insertion" | "link" | "list" | "listbox" | "listitem" | "log" | "main" | "marquee" | "math" | "meter" | "menu" | "menubar" | "menuitem" | "menuitemcheckbox" | "menuitemradio" | "navigation" | "none" | "note" | "option" | "paragraph" | "presentation" | "progressbar" | "radio" | "radiogroup" | "region" | "row" | "rowgroup" | "rowheader" | "scrollbar" | "search" | "searchbox" | "separator" | "slider" | "spinbutton" | "status" | "strong" | "subscript" | "superscript" | "switch" | "tab" | "table" | "tablist" | "tabpanel" | "term" | "textbox" | "time" | "timer" | "toolbar" | "tooltip" | "tree" | "treegrid" | "treeitem"
2. getByLabel()
Ideal for form controls associated with a label. For example, the input field for email address.
Example:
page.getByLabel('Email address')3. getByPlaceholder()
Selects input elements based on their placeholder text.
Example:
page.getByPlaceholder('Enter your username')4. getByText()
Finds elements containing specific text content. This is a good approach if the text you are targeting is unique and static.
Note: visible text inside the input fields is not text; it's a value. So it can't be selected by this method.
Example:
page.getByText('Welcome to our site')5. getByAltText()
Locates images by their alt text, if the "alt" attribute is available in the DOM for this image
Example:
page.getByAltText('Company logo')6. getByTitle()
Selects elements with a matching "title" attribute.
Example:
page.getByTitle('More information')CSS Attributes
While user-facing attributes are preferred, CSS selectors remain valuable in certain scenarios.
Use the locator() method with CSS selectors like this:
Find by ID:
Use the # sign followed by the value of id attribute
Example:
page.locator('#myIdValue')Find by class:
Use the "dot" sign followed by the value of class attribute. Note: the class attribute often contains multiple class values separated by spaces. You can target each of those values individually or combined.
Example:
page.locator('.myClassValue')page.locator('.myClassValue1.myClassValue2')Find by HTML tag:
It's simple. Just provide a tag name as an argument. Can be combined with class values or other attributes.
Example:
page.locator('button')page.locator('button.primary')Find by attribute:
Any HTML attribute can be used. Use square brackets to locate by attribute or attribute with value.
Example:
page.locator('[value]')page.locator('[value="green"]')Pro Tip
Avoid XPath selectors in Playwright. They're considered a bad practice due to their brittleness and poor performance.
Using Filters
When using a locator() method, you can make the locator more unique by providing a second argument filtering the output. Or use a filter() method, which has an identical behavior.
Example:
page.locator('button', {hasText: "Log In"})page.locator('button').filter({hasText: "Log In"})The filter() method can also be applied to user-facing locators.
Example:
page.getByRole('link').filter({ hasText: 'Learn more' })Pro Tip
Prioritize the second argument over the filter() method when possible for concise code. Use a filter() method for multi-level filtration.
Chaining Locators
You can combine multiple locators to create more specific selectors. Chain locators one by one, searching a child element within the scope of the previous locator.
Example:
page.locator('app-form').getByRole('button', { name: 'Submit' })This finds a button with the text "Submit" within an "app-form" element.
The Locator Picker: Your Secret Weapon
Playwright includes a powerful built-in tool called the Locator Picker. Quickly find the perfect locator with a single click. Access it through:
The Playwright VS Code extension.
At the bottom of the Playwright test explorer window, click "Pick locator". A new browser window will open, and navigate to the desired page. Click the target element on the page, and the locator will be copied to VS Code's clipboard.
Playwright's UI Mode
Open test in UI Mode with "npx playwright test --ui" command. Run the test. In the console window below, select "Pick locator" icon to identify the locator for the element
This tool is a massive time-saver and helps ensure you're following best practices.
Best Practices for Playwright Locators
1. Prioritize user-facing attributes (getByRole, getByLabel, etc.) whenever possible.
2. Use CSS selectors as a fallback when user-facing attributes aren't suitable.
3. Avoid XPath selectors entirely.
4. Leverage the Locator Picker to quickly generate optimal locators.
5. Chain locators for increased specificity when needed.
6. Use filters to further refine your element selection.
7. Keep locators as simple and readable as possible for better maintainability.
8. When using getByRole(), include the accessible name for precision.
9. Regularly review and update your locators as the application evolves.
10. Document your locator strategy for your team to ensure consistency.
Conclusion
Mastering Playwright locators is essential for creating robust, maintainable test automation frameworks.
By prioritizing user-facing attributes, leveraging advanced techniques such as chaining and filtering, and using tools like the Locator Picker, you'll be well-equipped to handle even the most complex web applications.
Remember, the key is to think like a user, not a machine.
Choose locators that reflect how people interact with your application, and your tests will be more resilient and meaningful.
Ready to take your Playwright skills to the next level? Check out my in-depth course on Playwright at Bondar Academy. You'll get hands-on practice, personalized code reviews, expert guidance to master these concepts, and more.
Check more related articles in our blog:
Frequently Asked Questions
Why should I avoid XPath selectors in Playwright?
XPath selectors are often brittle and can break easily when the page structure changes. They're also slower to evaluate than other locator types.
How do I choose between getByRole() and other user-facing locators?
getByRole() should be your first choice as it most closely mirrors how users interact with the page. Use other methods when getByRole() doesn't provide enough specificity.
Can I mix user-facing locators with CSS selectors?
Yes, you can chain multiple locator types.
How often should I update my locators?
Review your locators whenever significant changes are made to the application's UI. Regular maintenance prevents test failures caused by outdated selectors.